
Prev: Home
Next: Trazer Reference Manual
The “RKH project” incorporates CMake to make it easier to configure, build, and debug an embedded C/C++ application commonly used within this framework. CMake is an open-source, cross-platform tool that uses compiler and platform independent configuration files to generate native build tool files which are specific to your compiler and platform.
Using CMake can be quite advantageous to projects such as RKH. The most important benefits are listed below.
- The RKH source code, especially its neutral code, can be built on different systems like Linux, macOS or Windows using the same rules.
- CMake is primarily intended for using it from a command line interface (CLI), so the RKH building process can be automated to be executed from a continuous integration (CI) task.
- RKH can be included as a dependency in an existing project whose source code is built using CMake.
- CMake can generate build files for several build systems such as Make and Ninja as well as project files for IDEs such as Eclipse CDT and Visual Studio by using a simple option from a CLI.
- CMake can be used to build source code of languages such as C and C++ which are the most commonly used for embedded systems.
- Since CMake is a flexible tool it can be used to generate not only build files but also different output files like documentation.
The RKH CMake project was intended not only to develop new features and examples of RKH, but also to easily create applications based on it, which is the goal of this tutorial.
You can create applications using the RKH CMake project in two different ways. The first one, explained in the section Including RKH CMake project, consists in including the RKH CMake project in the application project by using the add_subdirectory command, whereas the other form uses the RKH CMake package, which is explored in the section Using RKH CMake package. Both alternatives have their own trade-offs, so you should choose one of them according to your requirements.
If you are not familiar with CMake, you could get started with the section Getting Started with RKH CMake project that explains how to generate build files. Thus, you can build an existing application provided as part of RKH. However, if you are used to using CMake, you should go ahead with the more advanced section on Application development that explains two different approaches to create an application from ground up and to build, debug, run and validate it as well.
Even though RKH was intended for embedded systems, all examples introduced in this tutorial are executed on an Unix system such as Linux or macOS since they are more flexible and faster than embedded ones for learning purposes.
Prerequisites
RKH has few host dependencies that you have to install to complete this tutorial. Most of them could be installed using apt-get in an Ubuntu host system.
Alternatives to install CMake
As regards CMake dependency, there are several ways to install it, depending on your platform. If you can not use apt-get to do it, you could follow some of these instructions.
Trazer
RKH allows you to verify and validate the behavior of a RKH based application at runtime by means of its built-in tracer and a simple console application called Trazer. It allows you to visualize the generated traces from an running instrumented application in a human legible manner. Follow these instructions to install it:
Download Trazer
Get the latest version of Trazer for platform Linux 64-bits from its official repository by typing:
Extract downloaded file
Check if it is alright
Change the directory to the place where the Trazer program is located, and then execute it with option -h.
Getting Started with RKH CMake project
RKH provides simple but self explanatory applications to demonstrate how to use it. These applications are based on RKH and they are called demos from now on. This section will use the existing demo Blinky to show you how to build, run and verify a RKH based application on an Unix based system.
It is assumed your working directory is called projects, located in <home>/projects. On Linux/macOS, <home> is equivalent to ~.
Get RKH
First of all, you have to get the desired version of the RKH project from its official repository. Since it is hosted in a GitHub repository it can be freely cloned via git by typing:
Build
Set up the development environment
The RKH environment is defined through the environment variable RKH_BASE that sets the path to the RKH base directory. It will be used by the build system. RKH_BASE can explicitly be set by typing:
Navigate to the demo project directory
Build
These instructions are part of the classic CMake build procedure:
You can also build with Ninja generator instead of Make:
You can also build with Ninja generator instead of Make:
Alternatively, if you are using a modern CMake, you can instead do this, no matter what generator your are using:
After building your application successfully, the results can be found in the directory build, for example the application executable called Blinky.
Find out more demo projects in the directory $RKH_BASE/demo. They are intended to show you how to use different features of RKH.
Debug
The generated application executable can be instrumented like any other Linux process. For example, with GDB or Valgrind. This section is a quick hands-on reference to start debugging your application with GDB, the GNU Project debugger. It allows you to see what is going on ‘inside’ another program while it executes or what another program was doing at the moment it crashed. In order to debug a program effectively, you need to generate debugging information when you compile it. To request this information, specify the -g option when you run the compiler. It is done when you define CMAKE_BUILD_TYPE=Debug. To generate debug information for Blinky type the following commands:
Then invoke GDB by running the program gdb. The most usual way to start it is with one argument, that is specifying an executable program. For Blinky application it is accomplished by typing:
Once a GDB session is started, you can debug your application by using GDB commands.
Application development
Overview
In the following sections we will assume your working directory is called projects, located in <home>/projects. On Linux/macOS, <home> is equivalent to ~.
Creating an application
This section will show you two different approaches to create a simple but self explanatory application based on RKH by using CMake. The first approach, explained in the section Including RKH CMake project, consists in including the RKH CMake project in the application project, whereas the other approach uses the RKH CMake package that is explored in the section Using RKH CMake package.
Keep in mind that RKH not only helps you develop a reactive application from the ground up, but also to reinforce the reactive part of an existing functional and not entirely reactive application. This section will only cover issues about the first scenario, i.e. creating an application from the ground up.
Including RKH CMake project
Creating a RKH-based application can easily be performed by including the RKH CMake project in the application project by means of the add_subdirectory command. It effectively adds the RKH source code tree to the build.
In this approach the build system is application-centric, i.e. it requires an application to initiate the building of the RKH source code tree. The application controls the configuration and build process of both the application and RKH itself, compiling them into a single binary.
A dependency consumed as suggested (in this case RKH) is a dependency from the application’s perspective known as a bundled dependency.
Even though this approach is simple and effective, it has downsides. The most important of them is that each application which may use RKH has its own copy of it. So every time you start a new project and add RKH as this approach suggests, you will have to build RKH from scratch. It is not convenient if such a build takes a long time though.
Assuming your application is under Git control, the best way to deal with a bundled dependency is to add it to an independent directory as a Git submodule. Git will help you to track modification of third-party code and merge it with future releases. In general, centralized all third-party code in one place is a good practice.
The application directory will contain either its own files and the RKH source tree. It looks as shown below.
CMakeLists.txt CMake is controlled by input files that, by convention, are called CMakeLists.txt. In this example, CMakeLists.txt defines where to find the other application files, it includes the subdirectory third-party to build the dependencies; and finally, it links the application files with RKH.
src An application typically provides one or more application-specific files, written in C or C++, which are usually located in a subdirectory called src. In this example, it includes the application source code and the configuration options. These files are listed below:
- signal.h: defines signals as enumerated constants, which are used as state machine triggers.
- event.h: defines event types, which are derived from RKH framework types.
- priority.h: defines active object priorities as enumerated constants.
- blinky.h/.c: specifies and implements the Blinky active object.
- main.c: contains the main() function, which initializes both BSP and the Blinky active object, and then executes the RKH framework in order to manage this reactive application.
- rkhcfg.h: configures RKH in compile-time.
- bsp.h: defines the BSP abstraction layer.
third-party It should contain the application’s dependencies and a CMake input file to control how to deal with them.
Create application directory
Having explained the content of an application directory, you should follow these steps to create a new one. Refer to Examples repository for existing RKH-based applications.
- Create an application directory on your workstation computer, outside of the RKH base directory. Usually, you will want to create it in a directory containing your projects under your user’s home directory, such as
<home>/projects. In an Unix shell, for example, navigate to a location where you want your application to reside, then type:bashmkdir blinky - It is recommended to place all the application source code in a subdirectory named
src. This makes it easier to distinguish between project files and sources, then type:bashcd appmkdir src - It is recommended to place the RKH source tree in a subdirectory called
third-party, so type:bashmkdir third-party
If your application is under Git control, you can add the RKH repository as a Git submodule; otherwise you can directly clone it or download it from its official repository. If you are going to add the RKH repository as a submodule, you have to append at least the following lines to a .gitmodules file located at the same level of the third-party directory. This file should contain at least:
Clone RKH in your repository typing:
- Create an empty
CMakeLists.txtfile in thethird-partydirectory. - Write at least the following lines to third-party’s
CMakeLists.txtto includeboilerplate.cmakefile and to add subdirectory RKH to the build.include(${CMAKE_CURRENT_SOURCE_DIR}/RKH/cmake/boilerplate.cmake)add_subdirectory(RKH) - Create an empty
CMakeLists.txtfile in your application directory. - Write at least the following lines to the top-level
CMakeLists.txt. They name your project Blinky and add a subdirectorythird-partyto the build.bashproject(Blinky LANGUAGES C)add_subdirectory(third-party) - Place your application source code in the
srcsub-directory. - Add your source code files to the Blinky target in your application directory’s
CMakeLists.txt.bashadd_executable(${PROJECT_NAME}src/main.csrc/blinky.c${CACHED_RKH_BASE}/demo/libbsp/platform/80x86/linux/bsp_blinky.c)target_include_directories(${PROJECT_NAME} PRIVATE${CMAKE_CURRENT_SOURCE_DIR}/src) - Link your application files with RKH source code. bashtarget_link_libraries(${PROJECT_NAME} PRIVATE rkh)
- Configure RKH features used by your application. Usually, you only create a file named rkhcfg.h in your application directory, where you enable or disable features provided by RKH.
Build
The defined build system compiles and links all components of an application into a single application image. On Linux and macOS you can choose between the Make and Ninja generators, whereas on Windows you need to use Ninja.
Set up the development environment
The RKH base environment is defined through the RKH_BASE environment variable that sets the path to the RKH base directory. It will be used by the build system. RKH_BASE can explicitly be set typing the following command on an Unix system:
Navigate to the application directory
Build
These instructions are part of the classic CMake build procedure:
You can also build with Ninja generator instead of Make:
Alternatively, if you are using a modern CMake, you can do this instead no matter which generator your are using:
After building your application successfully, all the build results can be found in the directory build, for example the application executable in this example it is called Blinky.
Rebuilding
You can force the build system to rebuild the entire application from scratch with the following procedure:
- Open a terminal console on your host computer, and navigate to the
builddirectorycd <home>/projects/blinky/build - Enter the following commands to delete the application’s generated files rm -r <directories>rm *
Run
Follow instructions provided in the section Run of Getting Started with RKH CMake project, but change the directory where your application resides as shown below.
Debug
Follow the instructions provided in the section Debug of Getting Started with RKH CMake project.
Using RKH CMake package
The RKH CMake package is another way to use RKH from an application. It ensures that CMake can automatically select RKH to build the application. By using this approach, a developer just needs to write find_package(rkh) at the beginning of the application CMakeLists.txt file.
Since RKH is a cross-platform framework and it is configured at compile-time, distributing it as a library binary is not a suitable and flexible option. In contrast, it is more suitable to provide the RKH source code and the proper rules to build it, and then generate your own RKH library binary according to your requirements. This section provides a guide to do that by using the RKH CMake package.
Workspace
An application can be placed anywhere into your system, but for a better understanding of RKH package’s usage, a directory structure, as the one shown below, is suggested. It contains both RKH’s installations and your own applications. In this example, the workspace named apps contains directories blinky and hello that represent two different applications depending on RKH, whereas the directory rkh-3.3.00 is a RKH installation, which was installed as a CMake package.
Creating your workspace on your workstation computer is the first step, so type the following commands:
Create application directory
Follow these steps to create a new application directory within your workspace.
- Create an application directory by typing: cd <home>/projects/apps/mkdir blinky
- It is recommended to place all the application source code in a subdirectory named src. This makes it easier to distinguish between project files and sources, so type: cd blinkymkdir src
- Create an empty
CMakeLists.txtfile in your application directory. - Write at least the following lines to the previously created
CMakeLists.txt.These lines name your project and include a RKH package version 3.3.00. The configuration file (rkhcfg.h) used to build the library is located within the RKH installation directory, in this caseproject(App LANGUAGES C)find_package(rkh 3.3.00 REQUIRED)<home>/projects/apps/rkh-3.3.00. Note that every time you need to change a RKH configuration option, you must rebuild and reinstall the RKH package. - Place your application source code in the
srcsubdirectory. - Add your source files to the Blinky target in the application’s
CMakeLists.txt.add_executable(${PROJECT_NAME}src/event.hsrc/priority.hsrc/signal.hsrc/blinky.hsrc/main.csrc/blinky.csrc/bsp.hsrc/bsp_blinky.c) - Link your application files with RKH source code. Library rkh::bsp for Linux GNU platform will be linked automatically. target_link_libraries(${PROJECT_NAME} PRIVATE rkh::rkh)
Having prepared your application within a workspace, then you can build and install a RKH package following the guidelines below.
Get RKH
Get the RKH project from its official repository. Since RKH source code is hosted in a public GitHub repository it can be freely cloned via git.
Having cloned RKH, you can use a specific version of it by checking out a specific tag by using the command git checkout. Since every released version of RKH is tagged as v<version>, you can view the RKH repo at a specific version typing:
To list stored tags in the cloned repo type:
This command uses the -l option and a wildcard expression of ‘v’ which returns a list of all tags marked with a ‘v’ prefix, used to identify official releases.
Build RKH
These instructions are part of the classic CMake build procedure:
You can also build with Ninja generator instead of Make:
Alternatively, if you are using a modern CMake, you can do this no matter what generator your are using:
After successfully building RKH, the build results can be found in the directory build.
RKH is configured at compile-time through a header file named rkhcfg.h. The build system gets its location from the variable RKH_CONF_FILE, which can be set in several ways:
- By passing
-DRKH_CONF_FILE=”<path/to/rkhcfg.h>”to cmake command or - by setting the CMake variable cache
CACHED_RKH_CONF_FILEor - by setting it in the environment,
- otherwise it is automatically set with the path of RKH base directory, only if there it exists a file named rkhcfg.h
In the previous example, the RKH configuration file was taken from the path <home>/projects/apps/blinky/rkhcfg.h. If an RKH package was reused by multiple applications within the same workspace, the RKH configuration file should be located in a more suitable place, for example, within a common directory.
The value of CMAKE_INSTALL_PREFIX used in the previous commands indicates the installation prefix to be searched by the find_package() command.
Install RKH
After building RKH, you have to install the generated files typing the following command:
Having used this command, the generated files are copied to a directory named rkh-<version> located in the path specified by CMAKE_INSTALL_PREFIX. The suffix <version> indicates the installed RKH version. For example, if you build and install RKH version 3.3.00 setting CMAKE_INSTALL_PREFIX as <home>/projects/apps, and then you repeat the same procedure but for the version 3.0.01, you will find the following tree in the path indicated by CMAKE_INSTALL_PREFIX:
Export RKH CMake package
Before using the RKH CMake package, it must be exported to the CMake user package registry. It means creating a reference to the current RKH installation inside the CMake user package registry. In Linux/macOS it should be found in ~/.cmake/package.
RKH CMake package is exported to the CMake user package registry using the following command:
Having installed RKH on your workspace, build and run your application as described in the following sections.
Build application
The defined build system compiles and links all components of an application into a single application image. On Linux and macOS you can choose between the Make and Ninja generators, whereas on Windows you need to use Ninja.
Navigate to the application directory
Build
These instructions are part of the classic CMake build procedure:
You can also build with Ninja generator instead of Make:
Alternatively, if you are using a modern CMake, you can do this, no matter what generator your are using:
After building successfully your application, the build results can be found in the directory build.
Run application
Follow instructions provided in the section Run of Including RKH CMake project.
Debug application
Follow instructions provided in the section Debug of Including RKH CMake project but invoke cmake setting the option CMAKE_BUILD_TYPE as shown below.
Verify and validate an application
While an instrumented RKH based application is running, you can validate and verify its behaviour through the RKH built-in tracer together with the Trazer tool. Each trace record includes a time stamp and additional information associated with it. A capture of Trazer output is shown below.
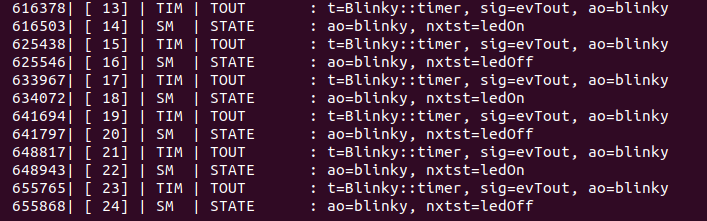
The figure above shows the trace records when the Blinky state machine processes an ‘after 2s’ trigger. Since RKH can generate more than 100 different trace records during its execution, its built-in tracer allows you to filter one or more trace records in runtime, so you can choose the traces that you just need. Find out more about RKH built-in tracer here.